
Podstawka dla Taua miała być w założeniu z elementami ruin. Wykorzystałam do niej wszystko to, co widoczne na zdjęciach ^^

I sculpted the tree-bark with Milliput.
Milliputem rzeźbię korę:


I use Vallejo Pumice to make the ground and place a few pebbles taken from construction sites there.
Z Pumice od Vallejo robię podłoże + kilka kamyków z budowy.


In the end I sculpted and additional slab for the back of the base. You'll see it on the next photos.
Na końcu dorzeźbiłam jeszcze jedną płytę na tyle podstawki. Zobaczycie na dalszych zdjęciach.
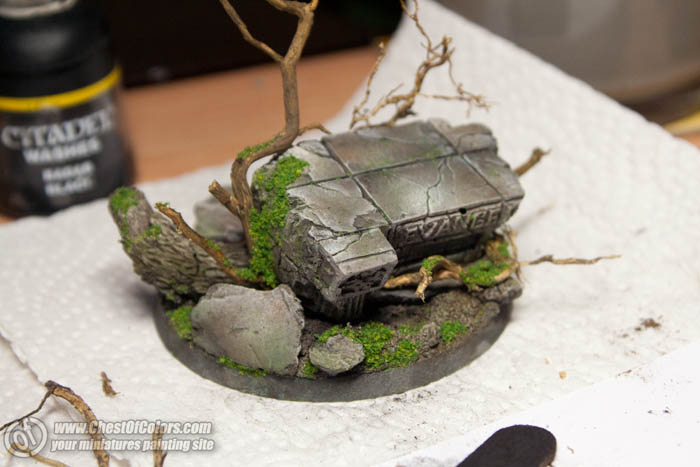
Colors used for the base:
white and black from P3,
Trollblod Highlight from P3
Citadel Washes Devlan Mud
Citadel Washes Badab Black
and one of Vallejo Game Color greens, not shown on the photo.
Unfortunately the label was faded and I lost my color list... and the new place I found for it when moving is not very intuitive, because 30 minutes of searching gave no result :/
Mahon will help - he has it all in his head not in a binder. ^^
Kolory na podstawkę:
biały i czarny z P3,
Trollblod Highlight z P3
Citadel Washes Devlan Mud
Citadel Washes Badab Black
i nieobecny na zdjęciu, kolor zielony z palety Game Color od Vallejo.
Niestety etykieta zatarta, a wyciąg kolorów gdzieś posiałam przy przenosinach ... nowe miejsce dla niego zdecydowanie nie jest intuicyjne, bo 30 min. poszukiwań nie przyniosło pożądanego efektu :/
Mahoń zaradzi - on to wszystko ma w głowie a nie w teczce ^^

The base was primed grey.
I applied washes of Citadel Washes Badab Black with an airbrush. Then I applied a wash of Citadel Washes Devlan Mud manually.
Podstawkę spodkłądowałam na szaro.
Aerografem wash'owałam Citadel Washes Badab Black,
a potem ręcznie Wash z Citadel Washes Devlan Mud:

Drybrushed with P3 Trollblood Highlight.
Drybrush z Trollblod Highlight z P3:


increased the chiaroscuro with white (drybrush) and black (shadows and cracks).
podkręcony światłocień białym (drybrush) i czarnym (cienie i pęknięcia):


Some glazing with Citadel Washes Devlan Mud to soften and break the white drybrush.
Miejscami jeszcze trochę laserunku z Citadel Washes Devlan Mud dla złagodzenia białego drybrushu:


I used one of the colors which will be used on the model to make the rock a bit green.
Kolorem jaki wykorzystam na modelu, zazieleniłam kamień:


I applied some shadows with a dry paintbrush and black pigment.


Na super glue, przykleiłam mech z posypki modelarskiej:

I used the dry brown pigment which was prepared earlier to color the moss a bit.
Brązowym pigmentem wcześniej wykorzystanym do barwienia kamienia, zabarwiłam na sucho mech:
Brązowym pigmentem wcześniej wykorzystanym do barwienia kamienia, zabarwiłam na sucho mech:

It's very likely that it's still not all, but the rest will be done and tweaked when the model is painted and attached to the base.
Bardzo prawdopodobne, że to nie koniec, ale resztę podmaluję i dopracuję, kiedy model będzie pomalowany i przymocowany.
My plans for today are not very ambitious :D I will sand another model that I am going to paint for Kabuki Models' collection... Doesn't look like much work, so I will document the preparations for painting.
Or maybe I'll try to approach the subject of weathering with hairspray?
Na dziś mam mało ambitne plany :D opiłuję następny w kolejności model malowany do kolekcji Kabuki Models ... zapowiada się mało pracy, więc udokumentuję przygotowania do malowania.
Albo może spróbuję ugryźć temat robienia zniszczeń za pomocą lakieru do włosów?

Fajny poradnik :)
ReplyDeleteAmazing efects! :D
ReplyDeleteThanks for that! Best wishes!
cML.
Very well done. Not only a fantastic base - but a great tutorial as well.
ReplyDeleteI look forward to seeing more.
Tony
http://dampfpanzerwagon.blogspot.com/
Świetny tutek i bardzo ładny efekt. Podoba mi się mech. Muszę go poszukać, tylko nie pamiętam firmy, która go sprzedaje, ale coś mi tam świta.
ReplyDeleteŚwietna podstawka:>.
pozdro
Great, I hope to see more like this in the future. Thank you!
ReplyDeleteImpressive work!
ReplyDeleteDzięki! Thanks lots!
ReplyDelete@LONGER_TOM - Faller
What is the resin ruin bit from?
ReplyDeleteIt's from Kabuki Models miniature: Mater Lacrimosa.
ReplyDeleteCzy mogłabyś napisać troszkę o tym jak wykonujesz laserunek, ewentualnie polecić mi jakiś tutorial który pasuje najbardziej do twojego sposobu na tą technikę?
ReplyDelete