Thursday, January 27, 2011

2 Ways to Chiaroscuro Effect

I keep receiving mail and private messages from hobbyists, most of them very kind and encouraging. Thanks for this! Some people ask me questions about my painting methods or techniques. Sometimes I don't have enough time to respond to all of them individually, but some of my answers could be useful to more people than only the person who asked the question.

I will be trying to publish such answers on this blog.
So here is one of such answers - expanded with some more information and served for your pleasure :)

 "How to build chiaroscuro with glazes?"

Dostaję trochę poczty i prywatnych wiadomości od hobbistów, większość bardzo miła i motywująca. Dziękuję Wam za to! Niektórzy pytają o moje metody i techniki malarskie. Czasem nie udaje mi się znaleźć dość czasu żeby każdemu odpisać indywidualnie, ale niektóre z moich odpowiedzi mogłyby się przydać gronu szerszemu niż tylko osobie, na której pytanie odpowiadam.

Postaram się prezentować takie odpowiedzi na tym blogu.
Oto jedna z takich odpowiedzi - rozszerzona o dodatkowe informacje i podana dla Waszej przyjemności :)

"Jak budować światłocień glaze'ami/laserunkiem?"

Chiaroscuro example

It can be done this way:
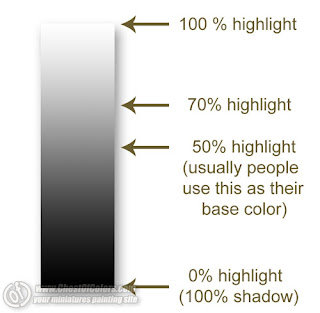
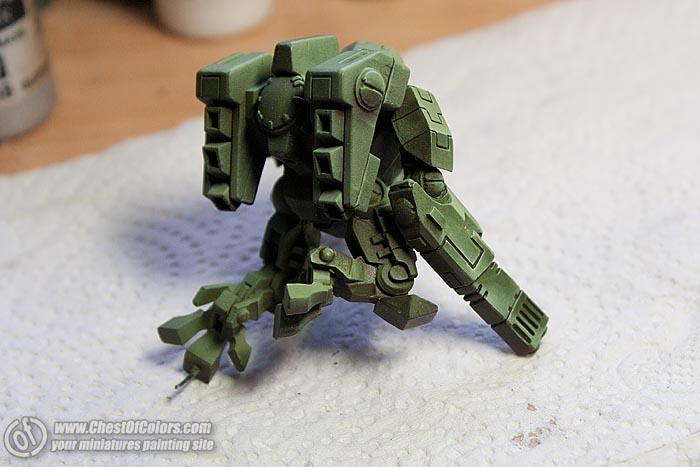
Cover the primer with your base color highlighted to some 70% of the final highlight you want to apply.

Do it in a smooth and even way, with a few layers (the more layers you apply and the thinner they are, the smoother surface you will have for applying your chiaroscuro, and it makes painting much easier).

When you  achieve a smooth surface without smudges, you have a choice: you can highlight to your final color first and shade it later, or do it the other way around.

It's more convenient for me to shade first and add my highlights in the later stages of painting.  This makes me feel free to build up shadows as deep as I want, and I feel this is the crucial factor in building the ambience of the miniature.

Można to zrobić na przykład tak:
Podkład pokryj kolorem bazowym rozjaśnionym w 70% (w stosunku do ostatecznego rozjaśnienia jakie zamierzasz nałożyć).

Zrób to równomiernie, kilkoma warstwami (im więcej warstw i są one rzadsze, tym gładszą powierzchnię będziesz miał przy rozkładaniu światłocienia, a to upraszcza malowanie).

Kiedy uzyskasz bezsmugową powierzchnię, masz wybór - możesz najpierw rozjaśnić do ostatecznego efektu a potem przyciemniać, albo odwrotnie.

Mnie wygodniej jest najpierw dążyć do cienia, a na końcu ostatecznie rozświetlać. Dzięki temu czuję się nieograniczona w budowaniu cienia, który moim zdaniem jest głównym czynnikiem budującym nastrój.

Color transition
 
When shadows are created and the ambience of the miniature is definied, creation of final lights is the cherry on top of it all. It's much easier for me to see where it's best to focus the viewer's attention with stronger light when most of my work is already done. 

Additional suggestion: 
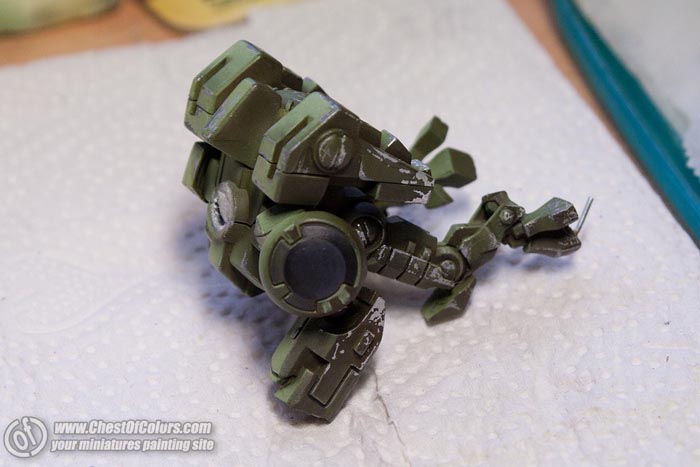
Start your shading of the base color (I mean the one highlighted to 70%) with with gradual rebuilding of saturation of the color which was initially highlighted. 

Only when the pure base color is applied you can start adding shading colors to it. Cover smaller and smaller areas with subsequent layers of darker and darker colors, and it will build the final shadows :)

Gdy już mam cienie i stworzony klimat, "wisienką na kremie" jest ostateczne oświetlenie. Łatwiej jest mi dostrzec gdzie najlepiej przyciągnąć wzrok mocniejszym światłem, gdy większość roboty jest już wykonana.

Dodatkowa sugestia:
Na kolorze bazowym (czyli tym rozjaśnionym w 70%) cieniowanie rozpoczynaj od stopniowego odzyskiwania nasycenia koloru, który nakładałeś rozjaśniony.

Dopiero po nałożeniu na figurkę 100% czystego koloru, zacznij dokładać do niego kolor cieniujący. Pokrywaj stopniowo coraz mniejsze powierzchnie, coraz to ciemniejszym kolorem, a uzyskasz w ten sposób ostateczne zacienienie :) 

Never start shading with the color of ultimate shadows. This would reduce your chances of creating smooth transitions of colors.

A cook would say that it's just like with bechamel sauce ;) if you don't add colors in tiny steps, you won't avoid streaky finish, just like you wouldn't be able to avoid lumps in your sauce ;)
So remember to apply any changes of colors or transitions gradually.

bechamel sauce

Nigdy nie zaczynaj cieniowania od ostatecznego koloru cienia. Przez to zmniejszasz swoje szanse na gładkie przejścia.

Kucharz powiedziałby Ci, że to tak samo jak z sosem beszamelowym ;) jeśli nie będziesz stopniowo małymi kroczkami dokładał kolorów, to nie unikniesz smug, tak jak w sosie beszamelowym grudek ;)
Wszelkie zmiany kolorystyczne czy przejścia wprowadzaj zatem stopniowo.

Glazing is a good method to learn shading - it's pretty radical because it doesn't forgive the smallest mistakes and makes them stand out in the final effect ;)  but when you make it through this, there will be nothing more to fear!

Remember about the right way of holding the paintbrush against the surface and not leaving too much liquid on the brush (I don't remember if I have already written about wiping the excess of paint off - for example against a palm. Have I?)

Laserunek to dobra metoda na uczenie się cieniowania - dość radykalna bo nie wybacza najmniejszego potknięcia i wytyka je nawet w efekcie końcowym ;) ale jak przez to przebrniesz, to nic Ci nie będzie straszne.

Pamiętaj o dobrym ustawieniu pędzla w stosunku do powierzchni i o tym, żeby nie zostawiać za dużo płynu na pędzlu (Nie pamiętam, czy pisałam Ci o obcieraniu nadmiaru farby np. o dłoń. Pisałam?)

Most likely you won't be able to succeed with only one model messed up ;) but it only spices the future success up a bit. :-D
But just in case let me tell you it can be done in a different way too...

Another method:
When I want to achieve very deep shadows, I paint the model in a monochrome way first. For example I paint the model in black and white only, and only then apply colors on top of this. It only requires some intuition about how much shadow should be placed and where to place it to be able to squeeze the planned colors over the transition later.... I often feel it's the easier method for me, but you have to find out what is more enjoyable and easier for you.

This method of shading doesn't reduce saturation of paints because you apply the same color over the whole surface, without mixing it with black or white. Get it?

For this sequence of painting I find transparent paints, washes and inks most useful. But of course it all depends on the effect you want to achieve.

Pewnie nie skończy się na jednym skopanym modelu ;) ale to dodaje tylko smaczku późniejszemu sukcesowi. :-D
Ale na wszelki wypadek uprzedzę, że można jeszcze inaczej...

II metoda:
Kiedy chcę osiągnąć bardzo głęboki cień, to maluję najpierw monochromatycznie, np. biel cieniuję do czerni, a dopiero potem dokładam barwy. Do tego trzeba jedynie umieć wyczuć ile cienia i gdzie umieścić, tak by pomiędzy zmieścić zaplanowany kolor... tak mi się nawet łatwiej maluje, ale Ty sam uznaj co sprawia Ci większą łatwość i przyjemność.

Taka metoda cieniowania nie tłumi soczystości barw, bo taką barwę nakładasz na powierzchnię w czystej postaci - nie stłumionej przez zmieszanie z czernią, czy bielą. Rozumiesz?

Przy tej kolejności malowania najlepiej sprawdzają się farby transparentne, inki i washe. Wszystko zależy jaki efekt chcesz osiągnąć ...

Underpainting

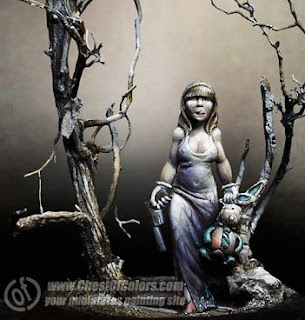
For example that's how I painted "Peace & Love" - you can read about it in Game Forces #21.

Generally I wanted to achieve the look of muted colors so I used the first technique of glazing for this model, but some parts of it - where I wanted to create a focus for the viewer's attention - I applied colors in the last stage over a monochrome underpainting. 

That's how I tried to control your minds ;P I attempted to emphasize the elements which were most important for me and direct your attention there.

Tak na przykład malowałam "Peace & Love" - możecie przeczytać o tym artykuł w 21. wydaniu Game Forces.

Generalnie chciałam osiągnąć efekt stłumionych barw i malowałam go tą pierwszą techniką laserunku, ale miejscami - gdy chcę przykuć spojrzenie obserwatora - nakładam barwę właśnie jako ostatnią na warstwie monochromatycznej.

Tak to podejmuję próbę przejęcia kontroli nad Waszymi umysłami ;P Staram się uwydatnić elementy które były dla mnie najistotniejsze i tam pokierować Wasz wzrok.

And what is your experience with chiaroscuro? How do you achieve it in your works? Do you also use glazes for this purpose, or do you prefer other methods of blending?

A jakie są Wasze doświadczenia ze światłocieniem? Jak go budujecie w swoich pracach? Czy także używacie w tym celu laserunków, czy wolicie jakieś inne metody?

Saturday, January 15, 2011

Leona Lobo's colonial marine camoflage - tutorial

A fellow Chest of Colors forum member asked me a question, which may be useful for somebody here: How was the camouflage of Kabuki Models' Leona Lobo painted.

The palette (most likely):
White, Black
Vallejo MC 877 Gold Brown
Vallejo MC 889 USA Olive Drab, or alternatively Vallejo MC 70830 German FieldgreyWWII
Vallejo Game Ink Violet

Dostałam pytanie od kolegów z forum Chest of Colors, które może i tu komuś się przyda: Jak malowałam kamuflaż na spodniach modelu Leona Lobo z Kabuki Models?

Paleta (najprawdopodobniej):
White, black
Vallejo MC 877 Gold Brown
Vallejo MC 889 USA Olive Drab, ewentualnie Vallejo MC 70830 German Fieldgrey WWII
Vallejo Game Ink Violet

So I started with grey primer, highlighted zenithally to white. 
I had a picture of camouflage from Aliens.

Otóż zaczęłam od szarego podkładu, i rozjaśnienia go aerografem zenitalnie bielą.
Miałam wzorzec kamuflażu z Aliena.


First I painted the darkest patches - they focus attention most easily, so I judged their placement was most important. 
I didn't feel bold enough to start, so I thinned the color a lot with Glaze Medium and gave painting the shapes a shy go. This allowed me to correct them with ease whereever it was necessary.
When I finished it, I shaded those patches which were not under direct light. 

Najpierw malowałam najciemniejsze plamy - najbardziej rzucające się w oczy, więc na mój rozum, powinny być najlepiej rozmieszczone.
Ponieważ nie miałam śmiałości zacząć, to mocno rorzedziłam ten kolor w Glaze Medium i nieśmiało nakreśliłam kształt plam. Dzięki temu, mogłam bez wysiłku nanieść korekty tam gdzie chybiłam.
Kiedy z tym się uporałam, przyciemniłam te, które nie były pod bezpośrednim oświetleniem.

The next stage was filling the rest of surface with sand-colored patches.
It was much easier because I was already in on the right track.
Then I emphasized the white patches where patches were touching each other - I sharpened the borders, especially the yellowish-colored ones.
Finally I painted the shadow on her trousers using glazes od the darkest camo color with a little violet (Vallejo Game Ink Violet) + Glaze Medium.

Następny etap, to wypełnienie części z pozostałej przestrzeni plamami w piaskowym kolorze.
Tu już było łatwiej, bo złapałam bakcyla.
Potem podkreśliłam białe plamy przy krawędziach plam - wyostrzyłam granice, zwłaszcza te z żółtym kolorem.
A na końcu namalowałam cień na spodniach - laserunek z koloru najciemniejszego z kamuflażu i odrobiny fioletu (Vallejo Game Ink Violet) + Glaze Medium.

Does anything more require explanation?

Czy jeszcze coś wymagałoby wyjaśnienia?

Tuesday, January 11, 2011

How to hold a brush

Yesterday we said hi to Balrog's third tooth, and today we said bye-bye to some of his toys :( We were sad to part with his mobile (no, not a mobile phone) and bouncer (no, not a muscular guy but a kind of a chair), which has been bouncing off the floor under Balrog's weight for like a month :-/
The animals from the mobile were like a family to him - his best friends... and ours too ^^ after all we used to earn like 40 minutes of sleep thanks to them!
I can't express how grateful we were, so the parting was done with all the respect deserved.

Wczoraj witalismy trzeci ząb Balroga, a dziś urządziliśmy pożegnanie zabawek :( Z żalem żegnaliśmy karuzelę i bujaczek, który pod ciężarem Baldka od miesiąca stukał o podłogę :-/ 
Zwierzyniec z karuzeli, to prawie członkowie rodziny - jego najlepsi przyjaciele... i nasi też ^^ jak by nie było, dzięki nim zyskiwaliśmy całe 40 min. snu! 
Nie mam słów jakie okazały by wdzięczność, więc ostatnie pożegnanie było godne.

I am glad you were interested by my previous post ^^ (it means my posts are not totally useless)

Quintus wrote:
"Beautiful and professional. You can open a Sunday school :) Did you paint all the highlights with a brush or did you also use an airbrush?"
No, no, it was said to celebrate the holy day ;) The effect of airbrushing can be seen on the first photos of the tutorial, the rest was brushed-on.

Bardzo się cieszę, że ostatni wpis Was zainteresował  ^^ (to znaczy, że nie skrobię do szuflady)

Quintus napisał:
"Pięknie i profesjonalnie. Możesz otwierać szkółkę niedzielną:} Wszystkie rozjaśnienia malowałaś pędzlem czy również aerografem?"
Nie nie, jest powiedziane: dzień święty święcić ;) Efekt po aerografie widać na pierwszych fotkach tutka, reszta jest pędzlowana. 
Michal wrote:
"Wonderful tutorial... If you would only feel like showing some techniques for beginners... a whole mass of Polish enthusiasts would be eternally thankful to you"
So here you go ;) Something for the nice start:

Michał napisał:

"Tutorial cudo... gdyby ci się chciało jeszcze parę technik dla początkujących pokazać... to cała rzesza polskich zapaleńców była by ci dozgonnie wdzięczna"
No to proszę :) Coś na miły początek:

When you paint it's important how you hold the brush.
I drag the brush in a more horizontal way - just like windscreen wipers in a car.
It's also important to keep the tip of the brush toward the shadow when you are highlighting, and the base of the brush - toward the highlight.


If you try to blend with the tip of your brush, you may end up failing, because the line of division of layers will be visible. But at the base of the brush there is not so much paint and as you pull the brush (just like the wiper I mentioned) it creates the transition. If you still haven't tried it, check it on a sheet of paper first :)

Ważne w malowaniu jest jak trzymasz pędzel.
Ja pędzlem pociągam trochę na leżąco - trochę jak wycieraczki w aucie.
Ważne jest też, żeby koniec pędzla był kierowany do cienia kiedy cieniujesz, a jego nasada była po stronie rozjaśniania.

Jeśli będziesz próbował robić przejścia czubkiem pędzla, to może to Ci się nie udać, bo wyjdzie Ci widoczna linia podziału między warstwami. Ale u nasady pędzelka nie ma aż tyle nagromadzonej farby  i ona sama po przeciągnięciu (jak wycieraczką samochodową) tworzy przejście. Jeśli jeszcze tego nie próbowałeś, to sprawdź sobie tą prawidłowość na kartce :)


And that's the way I am holding the brush when I am emphasizing the edges - highlighting:

Tak trzymam pędzel kiedy podkreślam krawędzie - rozjaśniam:


And what are your opinions and experiences in this subject?

A jakie są wasze uwagi i doświadczenia w tym temacie?

Saturday, January 8, 2011

Tau XV-89 Crisis Battlesuit - Tutorial

I prepared expanded version of my tutorial about painting the Tau battlesuit. Maybe you will find it interesting :) And what's up with you?

Yesterday I helped Balrog play soccer with our cat using a Christmas tree ball. As surprising as it may be, the more determined player was... Balrog ^^

And so we keep walking in our flat - sometimes sprinting to catch the ball or the cat, and sometimes just strolling with no goal at all.

Przygotowałam dla Was poszerzoną wersję o malowaniu Tau'a.
Może Was zainteresuje :) A co u Was słychać?

Wczoraj pomagałam Balrogowi grać z kotem w bombkę nożną. Zaskakująco, w grze większą determinacją wykazał się Balrog ^^

Tak to spacerujemy po całym mieszkaniu - czasem sprintem za bombką albo kotem, a czasem spacerowo bez widocznego celu.

When I am not working as a support for Balrog, I am tinkering with Red Sonja. The model is superb! I am enjoying painting it so much. And I had a good opportunity to practice my airbrushing skills, but I'll tell more about it later.

Soon I will show you how I painted her shield, because I managed to document it in detail.
Yesterday I also made an additional gaming base for the Tau model. I will show it when I download pictures from the camera.


W chwilach kiedy nie robię za podpórkę dłubię Red Sonję. Model jest suuuuper! Fajnie mi się ją maluje. Na dodatek udało mi się poćwiczyć z aerografem, ale o tym później.

Wkrótce pokażę Wam jak malowałam jej tarczę, bo to udało mi się nawet szczegółowo udokumentować.
Wczoraj zrobiłam dodatkową podstawkę do gry dla Taua. Też wrzucę, jak tylko zrzucę fotki z aparatu.

So much for announcements. Oh, no. 
I still remember about Arkadiusz's question:

"Could you tell which paints you like the most? I mean metallics, normal paints and washes. Such knowledge comes from practice, and it could be a valuable tip for beginning painters, especially thsat not always all paints  from one manufacturer are of the same quality."
(December 10, 2010)
I am preparing the answer in the free moments I have, so be patient, please.

Tyle z zapowiedzi.
Ach nieeee.
Ciągle mam na uwadze prośbę Arkadiusza:
"Czy mogłabyś napisać kiedyś jakie farby tobie najbardziej odpowiadają? Chodzi mi o metaliki, zwykłe i washe, taka wiedza przychodzi z praktyką, była by to cena wskazówka dla początkujących malarzy szczególnie że nie zawsze dana firma ma całą gamę farb na tym samym poziomie."
(10 grudnia 2010)
Przygotowuję odpowiedź w chwilach wolnych, proszę bądź cierpliwy.

And now let's return to the Tau...
I already described how I prepared the base for this model, so let's focus on the miniature now:

A teraz wróćmy do Taua...
Wcześniej opisałam jak przygotowałam podstawkę dla tego modelu, więc teraz skupmy się na samej figurce:

 
That's what the model looked like after:
1. priming it with grey spray primer
2. applying silver alcohol-based metallic paint with my airbrush
3. applying hairspray
4. airbrushing the armor with:
  • Vallejo GI Sepia + Vallejo GI Brown + Vallejo GC Cayman Green, to make sure that inks don't pool like water on glass
  • Vallejo GI Sepia + Vallejo GI Brown
  • zenithally applied Vallejo GC Cayman Green + a little Vallejo GI Sepia
  • zenithally applied Vallejo GC Cayman Green
  • smaller and smaller highlights with a mix of: Vallejo GC Cayman Green + Vallejo MC 952 Lemon Yellow


Tak wyglądał model po:
1. podkładowaniu szarym sprejem
2. nałożeniu srebrnego metalika na bazie alkoholu za pomocą aerografu
3. nałożeniu lakieru do włosów
4. nałożeniu kolorów pancerza aerografem:
  • Vallejo GI Sepia + Vallejo GI Brown + Vallejo GC Cayman Green, żeby inki nie zachowywały się jak woda na szkle
  • Vallejo GI Sepia + Vallejo GI Brown
  • zenitalnie Vallejo GC Cayman Green + odrobina Vallejo GI Sepia
  • zenitalnie Vallejo GC Cayman Green
  • rozświetlam coraz mniejsze obszary miksem: Vallejo GC Cayman Green + Vallejo MC 952 Lemon Yellow


The palette of paints used for painting the armor:

Paleta farb do malowania pancerza:


That's how I worked on chiaroscuro on the armor:

Tak pracowałam nad światłocieniem pancerza:


My work was mostly about emphasizing the direction of light, increasing the contrast and centralizing the light on the model. 

The base color for the armor was Vallejo GC Cayman Green.
I highlighted it on the armor with Vallejo MC 952 Lemon Yellow,
and the final highlights were done with a mix of: Vallejo MC 837 Pale Sand + P3 Morrow White. It ended up very close to P3 Menoth White Highlight, but the paint bottle was empty so I had to resort to using a mix.

Shading the base color (Vallejo GC Cayman Green) was done by adding the mix of: Vallejo GI 72092 Brown + Vallejo GI 72091 Sepia.
The "before" and "after" photos can be seen here.

Before taking the photo I managed to add a little dark paint into the recesses just after airbrushing:

Głównie moja praca polegała na podkreśleniu kierunku światła, wzmocnieniu kontrastu, i zcentralizowaniu oświetlenia na modelu.

Kolorem wyjściowym pancerza był Cayman Green, Vallejo z Game Color.
Rozjaśniałam go na pancerzu  kolorem z Vallejo MC 952 Lemon Yellow, 
a ostateczne rozjaśnienia były robione mixem z: Vallejo MC 837 Pale Sand + P3 Morrow White. Wyszedł z tego właściwie P3 Menoth White Highlight, ale akurat pojemnik miałam pusty i musiałam się poratować miksem.

Cieniowanie koloru wyjściowego (Vallejo GC Cayman Green)
robiłam dodając do niego miks z: Vallejo GI 72092 Brown + Vallejo GI 72091 Sepia.
Efekt przed i po np. tu:

Zdążyłam do zdjęcia (po aerografowaniu), wpuścić ciemną farbę w szczeliny i zagłębienia:


And here we've got the effect with lights applied:

A tu efekt ze światłem:

The next stage was adding battle damage.

I scratched the paint with a knife, and thanks to the hairspray applied in early stages of my painting (see above) the layer of metallic paint was revealed, and not scratched off like the green paint.

As far as scratching is concerned I am a novice, so some paint chips were quite uncontrolled. I think that a more experienced person doesn't lose control over the process. For example I didn't plan so strong paint chipping on the backpack. The paint peeled off with larger patches. 
It also turned out that I didn't apply the hairspray in an even coat, and so in some spots the metallic paint was very likely to peel off as well. 
If it had only chipped off it would still be easy, but this also didn't allow me to try scraping the paint off with a brush. I was afraid that while reaching the metallic layer the brush will spread metallic pigment all over the surface.

I am mentioning all my mistakes so you may be able to avoid repeating them ;) It's much better to learn from mistakes of others than your own.

For a short time I stopped chipping the paint in order to paint a freehand.
I took the patterns from a Tau decal sheet.

I hope I did no faux-pas. I inscribed one Tau symbol into another (the most popular one), and filled the empty space with Tau runes.
After painting the shield I scraped some paint off it... but why am I writing it ;] you can see it here:

Kolejny etap to uszkodzenia.

Zdrapywałam farbę nożykiem, a dzięki lakierowi do włosów nałożonemu na początkowym epapie prac (patrz wyżej) spodnia warstwa metalicznego koloru została ujawniona a nie zdrapana jak zielona.

W skrobaniu jestem nowicjuszką i przez to niektóre odpryski były dość niekontrolowane. Wydaje mi się, że bardziej wprawionej osobie to nie wychodzi spod kontroli. Np. nie planowałam tak silnych odprysków na plecaku. Farba odskakiwała większymi płatami.
Na dodatek okazało się, że lakier nałożyłam nierównomiernie i bywały miejsca, gdzie metaliczna farba też chętnie by odeszła.
Jak by tylko odpryskiwała, to był by pikuś, ale przez to nie mogłam spróbować jak się przeciera/wyciera farbę przebijając się do metalu za pomocą pędzla. Obawiałam się, że przebijając się do metalicznej warstwy, pędzel rozniesie mi metalowy pigment po całej powierzchni.

Wspominam o tych wszytkich potknięciach, bo może Wam uda się uniknąć takich numerów ;) Przyjemniej uczyć się na cudzych błędach niż własnych.

Odeszłam na chwilę od odprysków i zabrałam się za malowanie freehandu.
Wzory wykorzystane, zaczerpnęłam z arkusza kalkomanii do Tau.

Mam nadzieję, że nie popełniłam faux pas.
W jeden symbol Tau wpisałam inny (ten najpopularniejszy), a pustą przestrzeń zapełniłam runami.
Po malowaniu tarczę obdrapałam... ale po co ja to wszytko piszę ;] sami zobaczcie:


I covered the scratches with a glaze of Citadel Washes, which emphasized shapes of the scratches.

Obdrapania pokryłam laserunkiem z Citadel Washes, podkreśliło to kształt zadrapań.


Then I was applying dirt to metal with colors that I previously used to shade the armor: Vallejo GI 72092 Brown and Vallejo GI 72091 Sepia.

Potem brudziłam głównie metal kolorami jake wczesniej stosowałam do cieniowania pancerza, czyli: Vallejo GI 72092 Brown i Vallejo GI 72091 Sepia.


Sometimes I highlighed edges of paint chips, using the same colors as with highlighting the armor.

Niekiedy rojasniałam krawędzie odprysków - kolory jak przy rozjasnianiu pancerza.


Finally I took a critical look at the armor and decided it looked boring, so I added a symbol on the torso, and some display screens with imaginary numbers on the weapons. Plus a few diodes and weathering on the hooves ^^

Na koniec krytycznie spojrzałam na pancerz i uznałam, że jest nudno, więc na tułowiu dołożyłam znaczek, a na broni wyświetlacze ze zmyśloną numeracją. Do tego parę diodek i podniszczenia na raciczkach ^^


I added some dried leaves to the base, just like this:

Dokleiłam suszone liście do podstawki o tak:


And the finished model looks like this:

A oto jak wygląda model w całości:

Saturday, January 1, 2011

Wishing and kissing

May only good things happen to you in this whole year!

May your dogs not chew on your brushes and cats not push your minis off your tables, may your work not take your painting time, and painting - your sleeping time ;)

Niech się Wam dobrze dzieje przez cały rok!

Niech wam pies nie obgryza pędzli, kot nie zwala figurek, praca nie zabiera czasu na malowanie, a malowanie na spanie ;)


Our New Year's Eve party was not crazy, but I haven't started to miss such parties yet - after all I have been unable to party like that for half a year only ;)

Balrog perfected making his "lover's eyes", and he's done with his first kisses. Oh, those girls!
On the New Year's Eve night he charmed a girl from the party. She couldn't resist the look of his eyes from under the eyelashed and his eyebrows, crawled to him on all fours to give him a kiss.
He returned the favor by sharing his pacifier with her ;) And the rest was pretty much standard - romantic dinner on the kitchen floor and eating crisps from each other's hands.

Nasz sylwester nie był szalony, ale jeszcze nie zdążyłam się wytęsknić za takimi - w końcu szlaban na imprezy mam dopiero od pół roku ;)

Balrog opracował spojrzenie amanta do perfekcji, pierwsze pocałunki już za nim.
Ach te dziewczyny!
W Sylwestrową noc oczarował koleżankę z imprezy. Ta, nie mogąc oprzeć się spojrzeniu z pod rzęs i podrygującym brwiom, przyszurała na kolanach obdarzyć go buziakiem.
Odwdzięczył się jej za niego dzieląc się smoczkiem ;) Reszta to standard - romantyczna kolacja na posadzce kuchennej i jedzenie sobie z rąk chrupek.

As if it was not enough, today he picked up another girl today.
This one was more shy though, and she ran away just after giving him a kiss.

Gosh, if he's going to have a temper like my grandfather, who used to go to dancing parties with ten girls (and as he got older and told the same stories again, the number of girls tended to increase ;) - well, nevermind)... With my Balrog being such a Casanova, I may be unable to sleep peacefully for a long time still...

Jak by tego było mało, dziś podczas zabawy poderwał już inną koleżankę.
Tyle, że ta była bardziej nieśmiała, i po buziaku zwiała.

Rety jak będzie miał temperament po moim dziadku, który na potańcówki wchodził z dziesięcioma dziewczynami (z wiekiem i każdą opowieścią ta liczba rosła ;) - nieważne)... Z takim Casanovą długo jeszcze nie będę spać po nocach.