
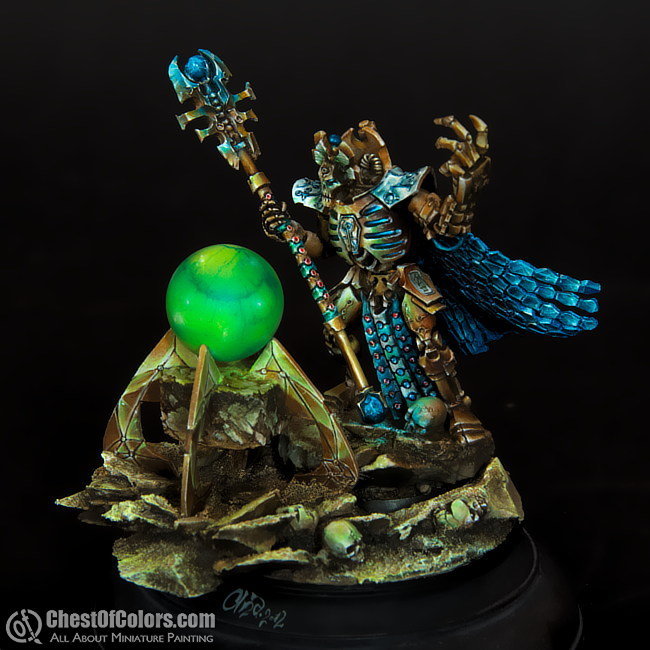
I promised myself I would prepare a report from painting Imotekh the StormLord, so here it is. But first let me show you the miniature we'll be talking about:
Obiecałam sobie, że przygotuję Wam reportaż z malowania Imhotekha StormLorda i oto on. Ale pozwólcie, że najpierw pokażę model, o którym będziemy mówić:

Let me mention it at the very beginning that my opinion doesn't differ from the common one: working with the material that Imotekh was made of was not any pleasure.
The model was bent, both halves of the staff were misaligned by some 1mm, and the whole surface was covered with holes and air bubbles.
I don't really mind the fact that companies experiment with new mixes of resins. It's great that they want improvement. But somebody should better have a good excuse for releasing this junk to the market.
Na wstępie zaznaczę, że moja opinia niczym nie różni się od ogółu - praca z tworzywem z jakiego był zrobiony Imotekh, nie należała do przyjemnych.
Model był powykrzywiany, styk połówek kostura przesunięty o 1mm, a całość pokryta dziurami po bąblach.
Nie mam nic przeciwko eksperymentowaniu firm z nowymi mieszankami żywic - fajnie, że chcą się rozwijać, ale za ten badziew wypuszczony na rynek powinien się ktoś gęsto tłumaczyć.


Preparation of this model for painting took a lot of my nerves. Had I been painting it for myself, it would most likely end up in the trashcan, but it wasn't the case so all I can do is complain in the best Polish manner :P Well, I also can show you how I corrected the misaligned casting of the staff:
Dużo nerwów kosztowało mnie przygotowanie modelu pod malowanie. Gdybym malowała go dla siebie pewnie wylądował by w śmietniku, ale było inaczej, dzięki czemu mam na co psioczyć stropolskim zwyczajem ;P No i mogę pokazać Wam np. jak korygowałam przesunięcie na kosturze:


And that's how I straightened the staff:
A tak prostowałam kostur:
Now I can also show you how I prepare a miniature for priming and airbrushing.
I like to have my models in a state that will not make reaching any parts complicated. That's why I usually paint the base and arms separately.
Mogę Wam też pokazać jak szykuję figurkę pod podkładowanie i aerografowanie.
Lubię mieć model w stanie nie komplikującym dojścia do żadnego z miejsc do malowania. Dlatego podstawkę i ręce zwykle robię osobno.


I like the general climate of Necrons and the sources of inspiration used to create this race. I wanted to emphasize it a bit more with my painting:
Podoba mi się klimat Nekronów i podoba mi się źródło inspiracji do ich stworzenia. W malowaniu chciałam mocniej to podkreślić:

I came up with an idea of a scene with an altar, and desert theme for terrain was an obvious choice to me, although it was also what the customer suggested. I posted a report from making this scenery in an earlier post, so here are a few more photos depicting creation of the altar:
Wymyśliłam sobie scenkę z ołtarzem, a teren pustynny był oczywistością, choć i również sugestią klienta. Wcześniej zamieszczałam już relację z robienia terenu, więc pokażę jeszcze kilka zdjęć z robienia ołtarza:


Here are the paints I used to paint this model:
Farby jakimi malowałam model:

Farbę z Vallejo Model Air wykorzystałam jednak tylko przy aerografowaniu.

And here's the effect of airbrushing – I prepared the chiaroscuro for further painting:
Efekt aerografowania - przygotowałam sobie światłocień pod dalsze malowanie:


Here's the mix of colours prepared for painting the armour. Initially I used P3 paints as the main colors for my mixing:
Mieszanka kolorystyczna na kolor pancerza. Początkowo głównymi kolorami do mieszanki były kolory z P3:


But quickly I realized that Vallejo Game Ink Brown would be a better choice (lower-left corner on the photo).
Szybko jednak zorientowałam się, że Brown z Vallejo Game Ink będzie lepszy (na zdjęciu w dolnym lewym rogu).


Here are more photos of the finished model. I wonder what you think about it ^^
A tu parę dodatkowych fotek skończonego modelu. Jestem ciekawa co Wy na to ^^


And why was I silent all that time?
Because time is slipping between my fingers... and do I know why?
Well, I kind of know... I painted something, but it wasn't what took the most of my time lately.
Balrog got a bit sick and it had a positive side because in this twisted world one has to be coughing in order to take a deep breath and stand back from everyday "chores".
Czemu milczałam przez ten czas?
Bo czas mi przecieka miedzy palcami ... czy wiem na czym?
No trochę wiem ... coś tam zmalowałam, ale ostatnio nie to mnie zajmuje.
Balrog trochę sobie pochorował - ku naszej w sumie uciesze, bo w tym naszym pokręconym świecie trzeba pokaszleć, żeby wziąć głęboki oddech i nabrać dystansu do "obowiązków".
How is Balrog going to do with the new experience, especially that during his sick leave he learned the meaning of the word "my"?
I wonder what would be the reaction to dressing him as Gollum for the costume party. Hmm?
No, no, I won't do it to him. It would be too cold and I already bought a Balrog costume anyway ;))

Jak sobie Balrog poradzi w klubie z nowym bagażem doświadczeń zwłaszcza, że w czasie chorobowego poznał moc słowa "moje"?
(Ciekawe z jaką reakcją spotkałoby się przebranie Goluma na baliku. Hmm?
Nie nie - nie zrobię mu tego. Zimno by mu było, a kostium Balroga już i tak kupiłam ;))

So much wonderful light!!! It creates the ambience itself. Amazing and stunning!
ReplyDeleteGreat job!
ReplyDeleteVery scenic and an awesome paint job as always Ana. :)
ReplyDeleteThanks ;P Good to read it - for me the mood is more important than smooth paintwork.
ReplyDeleteFantastic tutorial, Ana. Really like the resin-restoration part ;)
ReplyDeleteAbsolutely stunning work! As per usual haha. Keep it up Ana, I always await your next piece for inspiration!
ReplyDeleteI started to miss you... Nice nekron, but i would wish for more WIP photos.
ReplyDeletea amazing tutorial. thank you so much for taking the time to put it all together
ReplyDeleteMike
SCWH
A stunning piece of art, beutiful lighting and a realy good photo talk through of building the scene. Thank you.
ReplyDeleteYou're really one of a kind, Blessed hands to make such art, really cool. :D
ReplyDelete____________________
Liza | Labor Posters
Amazing. Mom, thnx for view into kitchen :)
ReplyDeleteAm new to this miniature painting,I started august last year with only 2 finished small vignettes made.I find it hard to juggle my time to paint and look after my lovely daughter when my wife's at work.YOU ARE AN INSPIRATION and I love your work Ana! Great tutorial! Thanks for posting and keep it coming!
ReplyDeleteLee Mendoza