Soon I received a request for visualization of the process of creating lava for his base.
Pokazałam w sieci moją wersję Vulkana He'stana (model Space Marine'a z GW).
Pojawiła się przy tej okazji prośba o zwizualizowanie procesu powstawania lawy na podstawce.
I already wrote an article about it, in which I described creation of the base for Taxxis - Queen of Undead with her Troll Deth from Hasslefree Miniatures.
You can find that lava tutorial on Chest of Colors, just like additional photos of the finished model.
Kiedyś już napisałam na ten temat artykuł, relacjonując powstawanie podstawki dla modelu Taxxis - Queen of undead with her Troll Deth z Hasslefree Miniatures.
Tamten tutorial o malowaniu lawy znajdziecie na Chest of Colors, podobnie jak więcej fotek poniższego modelu:
The creation of the later work I started with paying a visit to my uncle who's a carpenter ^^ He cut away the unnecessary part of the base:
A przy tej nowszej pracy zaczęłam od spaceru do warsztatu wujka stolarza ^^ Wyciął mi zbędny kawałek podstawki:
For creation of the base I used:
- stones
- Milliput (the red - standard - one) - I used it to create the rock by pressing texture of a rough stone in it.
- Pro Create - to sculpt lava
- tombstone and column from my bits box - origin of these parts is unknown to me
- Vallejo water effect
- hygroscopic balls (you will find them in a new wallet or handbag, where they're supposed to absorb moisture... I wonder if these aromatic balls you keep in your wardrobe are the same thing?)
- modelig gravel
Do zbudowania terenu wykorzystałam:
- kamienie
- Milliput (czerwony) - dorabiałam z niego skałę odciskając fakturę mocno fakturowanej strony kamienia.
- Pro Create - rzeźbienie lawy
- nagrobek i kolumnę z mojego pudełka z częściami - pochodzenie nieznane.
- wodę Vallejo
- kulki do pochłaniania wilgoci (znajdziesz je w nowym portfelu, czy torebce ... ciekawe czy kulki zapachowe do szafy to to samo?)
- żwirek modelarski
My work in chronological orger:
- Shaping the base (don't try it on your own! I saw what's missing from my uncle's hands)
- Placing the stones, tombstone and column
- Sculpting the missing parts of the rock
- Pouring Vallejo water effect to create a test trail of lava
- Sculpting the waves and edges of the lava
- Filling the lava part with even more layers of the water effect
- Placing the balls and gravel before pouring the last layer of the water effect
- Priming the whole thing
Chronologiczny przebieg prac:
- Wymodelowanie kształtu podstawki (nie próbujcie tego sami! Widziałam braki w stanie liczbowym u obu rąk wujka)
- Ustawienie kamieni, nagrobka i kolumny.
- Dorzeźbienie brakujących skał.
- Wylanie próbnie ścieżki lawy wodą Vallejo.
- Dorzeźbienie fal i brzegów lawy.
- Wypełnianie przestrzeni kolejnymi warstwami wody/lawą.
- Przed ostatnim wylaniem wody rozmieściłam kulki i żwirek
- Spodkładowanie całości
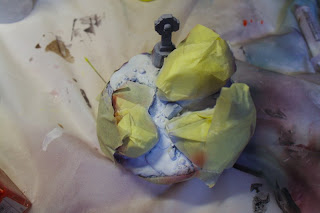
I masked everything that was not supposed to become lava with paper tape and Maskol. Then I grabbed my airbrush.
Okleiłam wszystko co nie było przyszłą lawą (taśma papierowa i Maskol)
A następnie chwyciłam za aerograf.
The first layer was white paint:
Pierwsza warstwa to biały kolor:
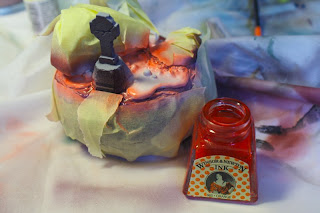
Winsor&Newton 965 Orange Ink:
Winsor&Newton INK 965 Orange:
Vallejo Game Ink Yellow and Red, Reaper 09991 Red Brick:
Vallejo Game Ink Yellow i Red, Reaper 09991 Red Brick:
That's all!
Let me know if you managed to achieve such effects, too ;)
To wszystko!
Dajcie znać czy Wam też wyszło ;)


WOW amazing glow and the use of desiccant is genious :D
ReplyDeleteGreat tutorial! The Lave looks so realistic!
ReplyDeleteSimply Awesome. :-)
ReplyDeleteBrilliant. I've never even thought of this with my airbrush. Much obliged...
ReplyDeleteYou don't have to use airbrush for it and can do similar things with brushes or cans of spray paint. But airbrush simply makes it easier. Any detailing has to be done with the good old method using brushes.
ReplyDeleteSuperb TYVM.
ReplyDeleteCS
wow thats awesome!.
ReplyDeleteAlso, will you be my mummy? :)
I am not sure if Balrog will be happy ;) Unfortunatelly he is jealous even of Mahon!
ReplyDeleteYou have to wait a several years ;P
Really amazing stuff! You know, I would have never thought of using hygroscopic balls under the water effect - now something I'll do religiously! Thank you!
ReplyDelete